Melt into a peanut butter dream with this homemade Butterfinger Pie! With its perfect balance of sweet and salty flavors, this dessert is guaranteed to satisfy your sweet tooth and leave you wanting more.
If Butterfinger was your favorite candy bar growing up, you’ll love this super easy Butterfinger Ice Cream. It’s cool, creamy, and full of that classic candy flavor we all love! My Butterfinger Poke Cake is another crowd-pleasing option. It couldn’t be easier and has layers of flavor in every bite!
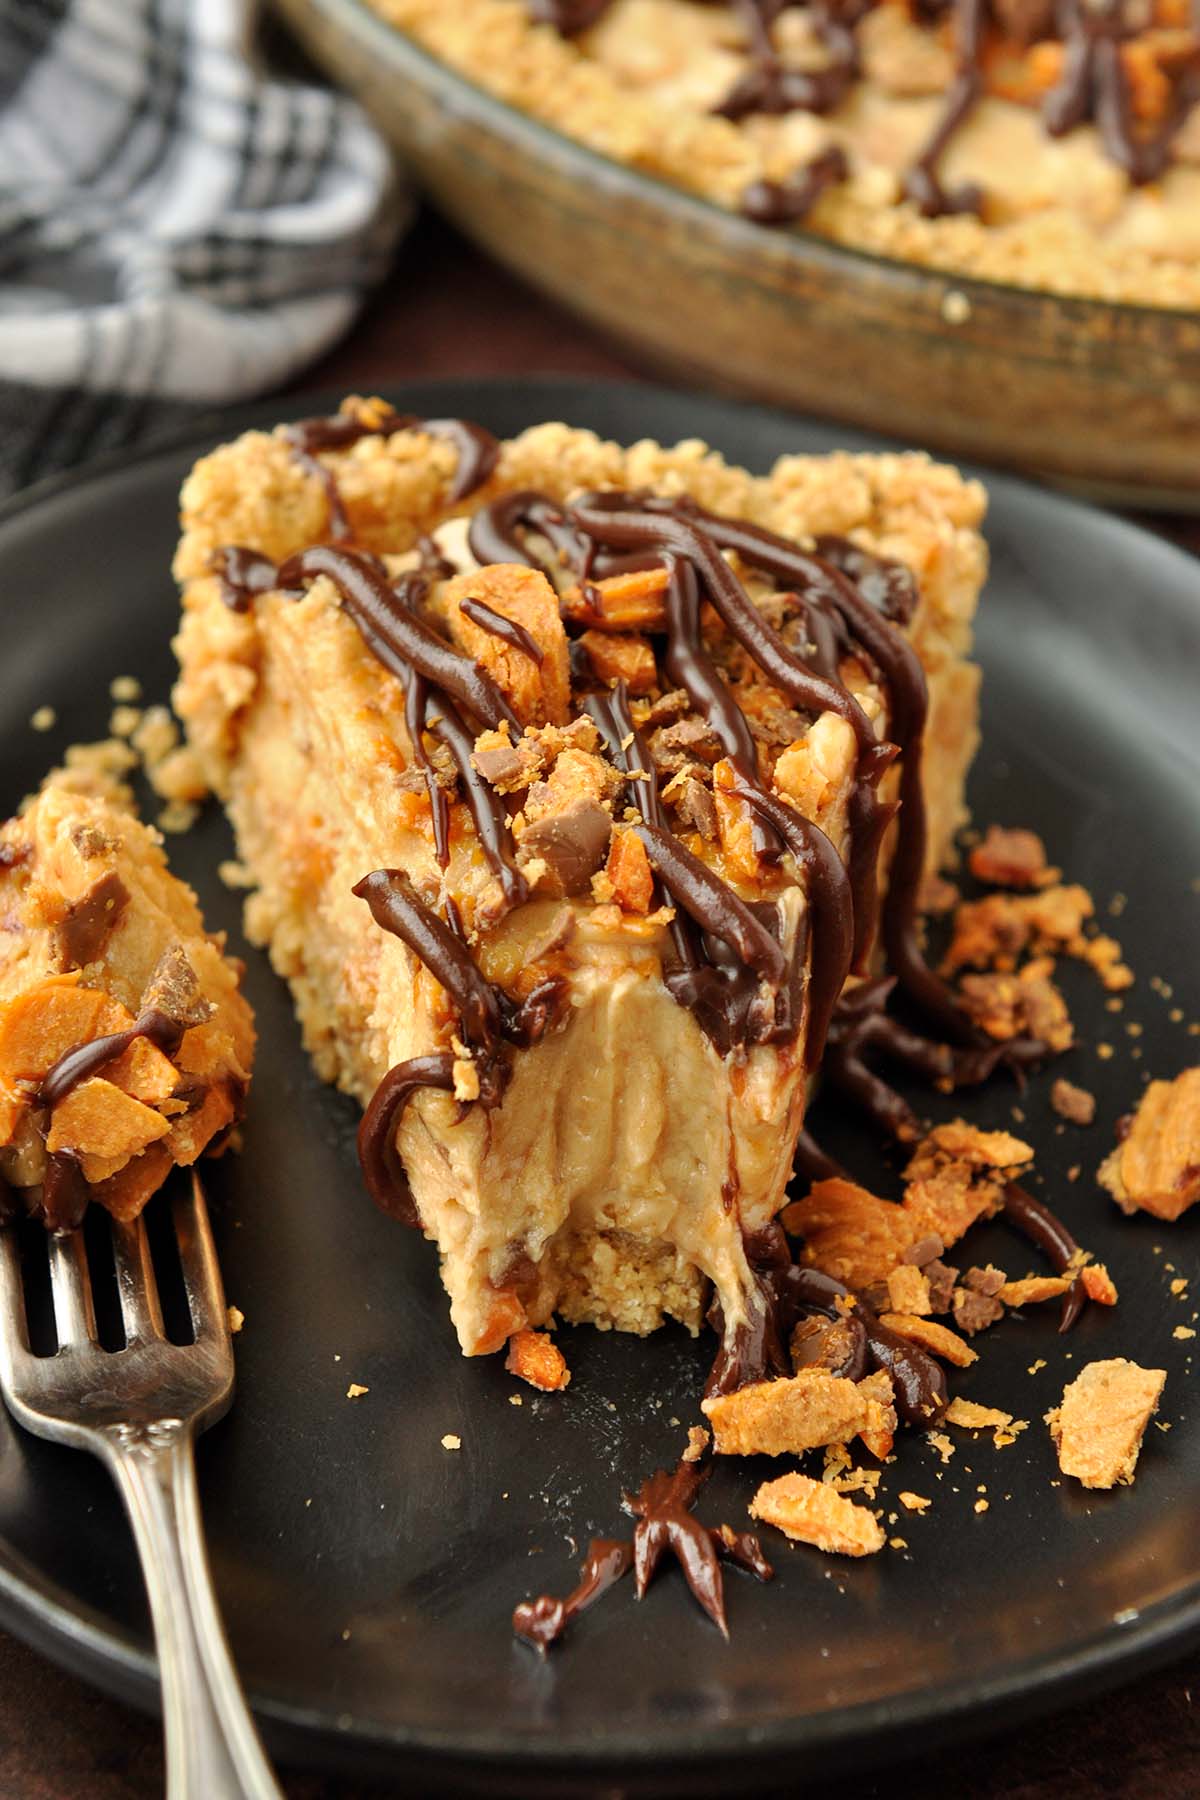
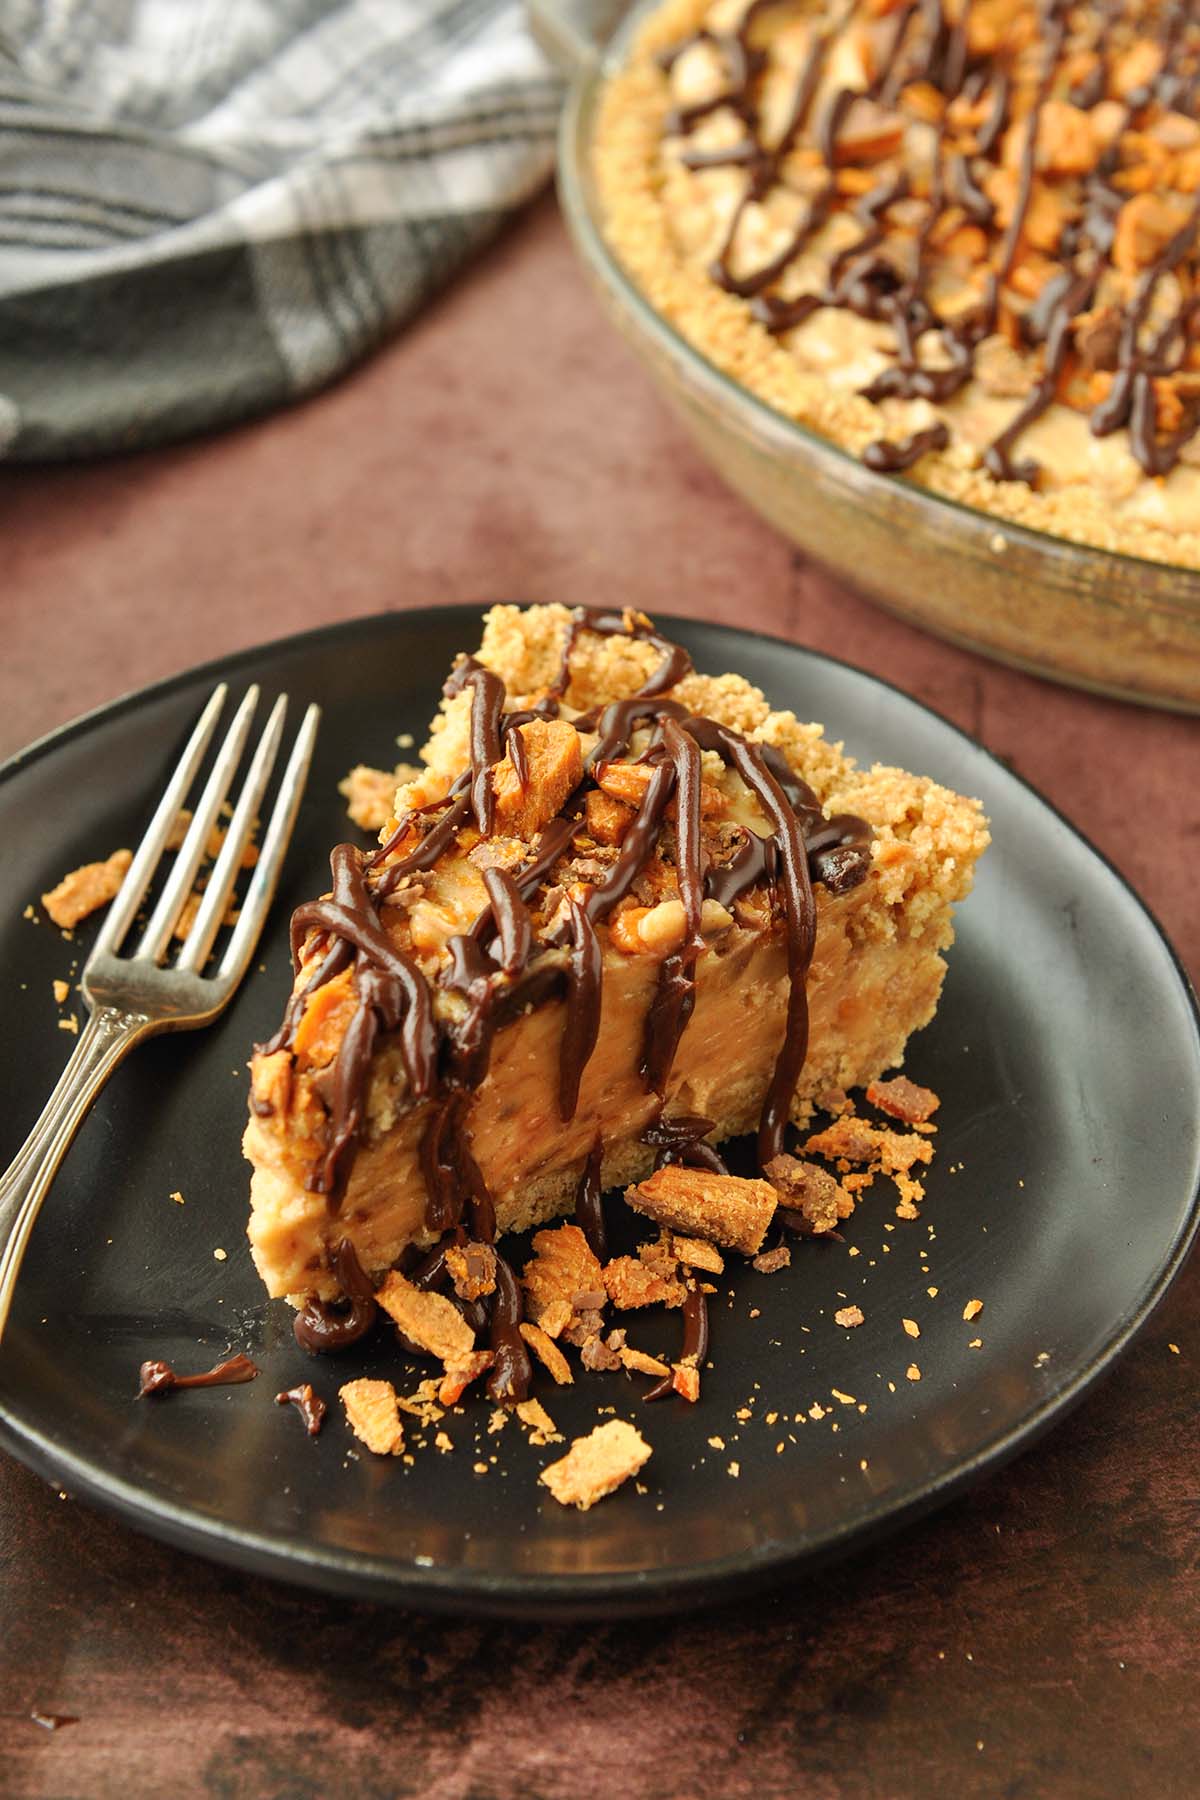
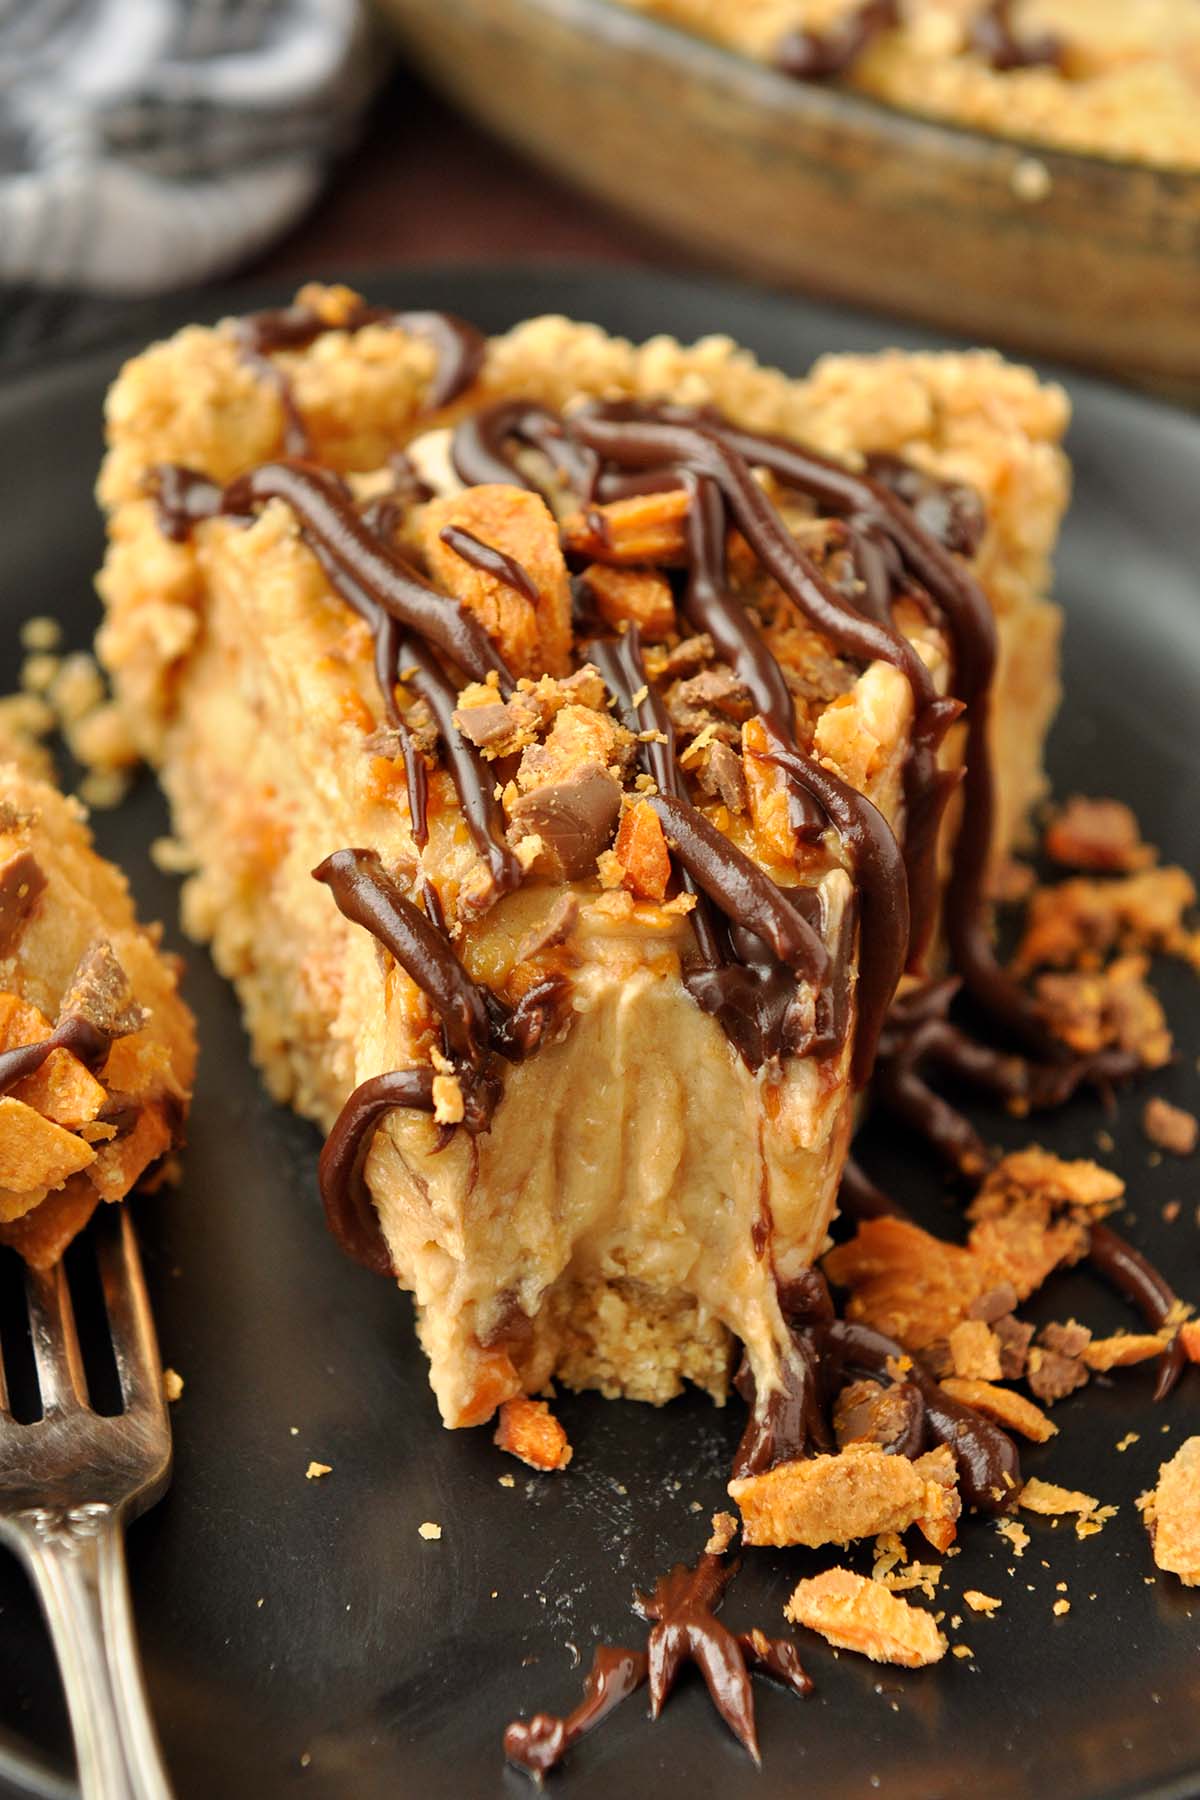
The best thing about this Butterfinger Pie is how quickly it transports you back to childhood! It has that iconic Butterfinger flavor, but all grown up. The creamy filling and rich chocolate ganache take the Butterfinger experience to the next level.
As a chilled pie, it’s easy to make in advance and only requires a few simple ingredients commonly available at any grocery store. This is the best Butterfinger pie and will surely delight all of your guests, especially the Butterfinger fans!
What is Butterfinger Pie?
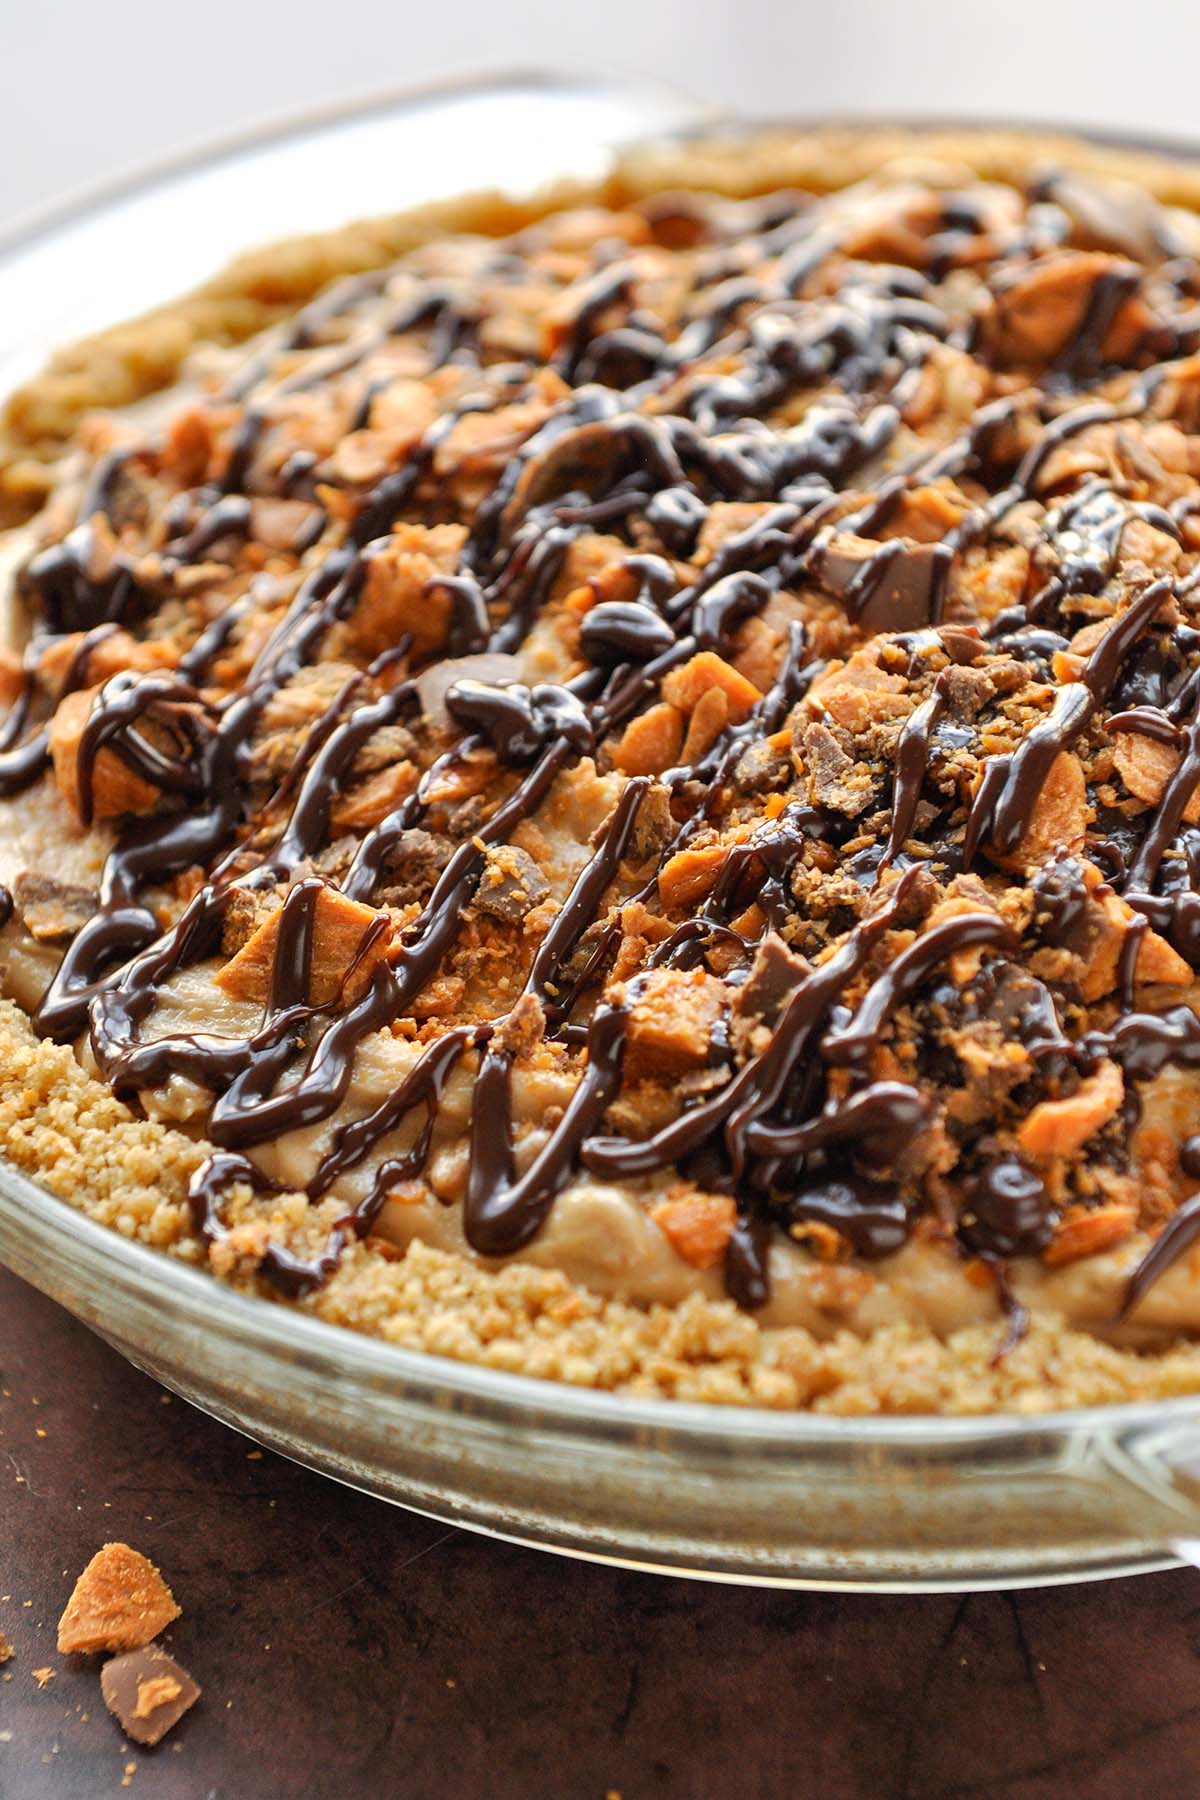
If you’re a huge Butterfinger fan, you’ll want this decadent Butterfinger pie recipe for every birthday or party! Since the main flavor in Butterfinger is peanut butter, this pie has a peanut butter filling with pieces of chopped Butterfinger candy bars!
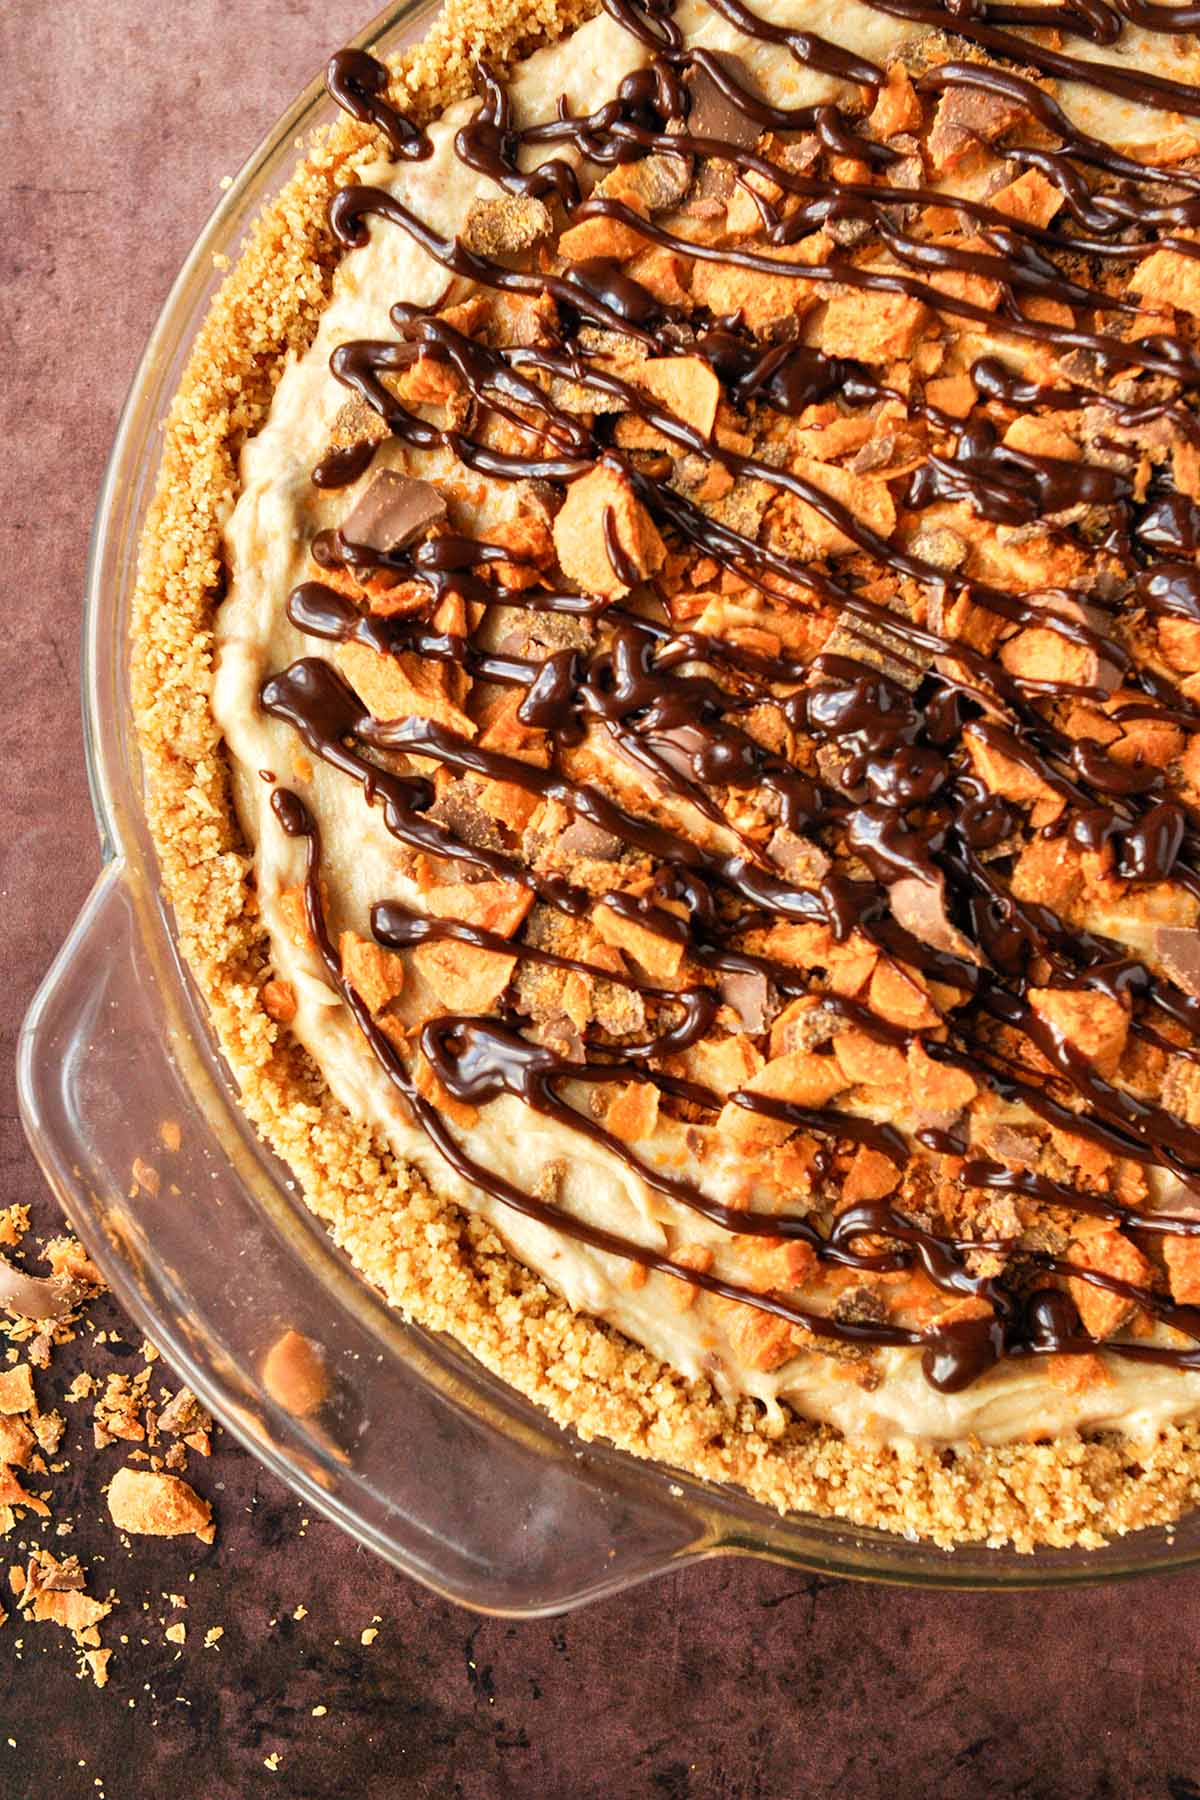
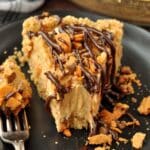
The filling is poured over a graham cracker crust and topped with a chocolate ganache drizzle and more candy pieces. It’s served chilled from the fridge for a refreshing sweet treat.
This creamy Butterfinger pie is a true flavor experience. From the crunchy crust to the creamy peanut butter filling to the bites of candy pieces throughout the pie, it’s the perfect dessert to cool down on hot summer days or to enjoy any time of the year!
Butterfinger Pie Ingredients
It’s so easy to make this no bake Butterfinger pie! For full ingredient amounts and full instructions, just check out the recipe card at the bottom of this blog post.
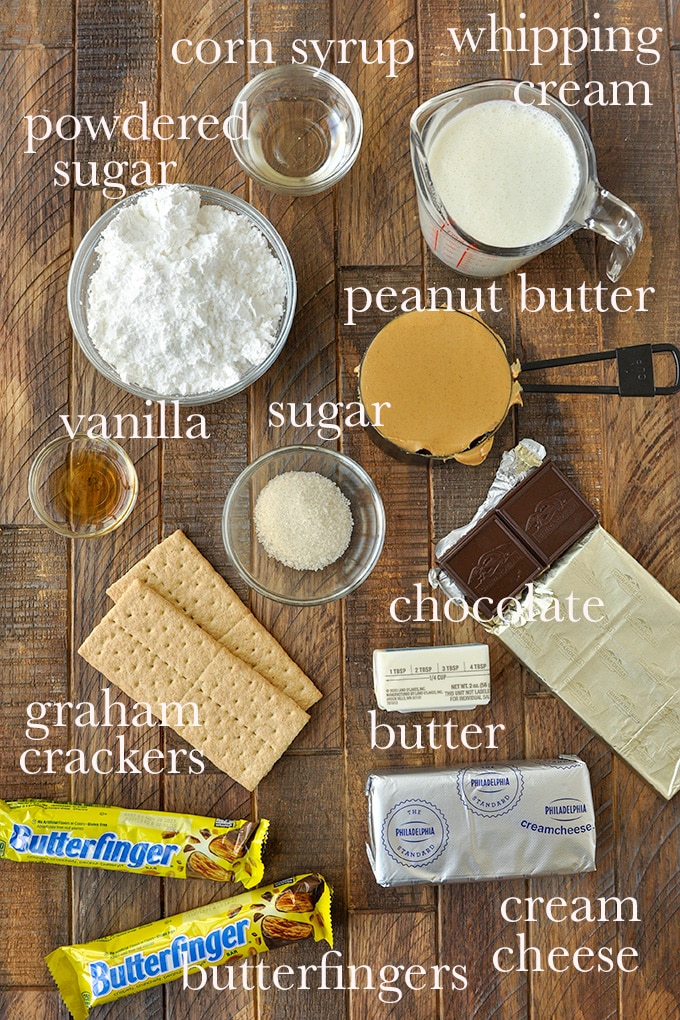
Crust
- Graham crackers: Crush graham cracker sheets to make your own crust. You can also use Oreo cookies for a chocolate crust.
- Sugar: Add a bit of sugar to sweeten the crust.
- Melted butter: The butter will help hold the crushed graham crackers together to mold them into your pie plate.
Filling
- Creamy peanut butter: Start with creamy peanut butter to get tons of peanut butter flavor in your creamy Butterfinger filling.
- Cream cheese: Softened cream cheese will add a nice texture to the filling and offset the richness of the peanut butter filling.
- Powdered sugar: Unlike granulated sugar, confectioners’ sugar will disappear when whipped in the filling.
- Vanilla extract: A little vanilla gives any dessert a decadent aroma.
- Heavy whipping cream: When whipped, the whipping cream will thicken to form a smooth, luscious filling.
- Butterfinger candy bars: Chopped Butterfinger pieces are the perfect way to add Butterfinger flavor into every bite.
Ganache Drizzle
- Heavy whipped cream: To make a ganache, gently heat the cream with chocolate until it melts together.
- Corn syrup: Corn syrup will give your ganache the perfect sheen even after it hardens!
- Chocolate: Use bittersweet or semi-sweet chocolate chips to offset the sweetness from the filling.
- Salt: Add a pinch of salt to draw out the sweetness and the flavors in the drizzle.
Garnish
- Butterfinger candy bar pieces: Save a few extra Butterfingers to chop into small pieces and add on top of the pie!
How to Make Butterfinger Pie
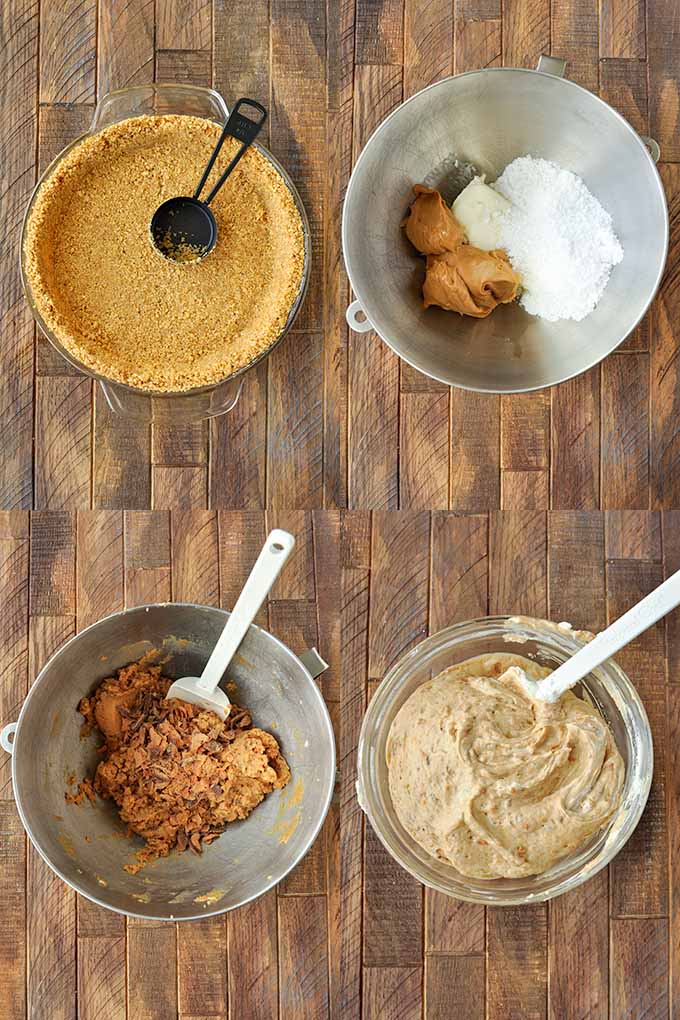
STEP 1: Prepare the crust. In a medium mixing bowl, combine graham cracker crumbs, sugar, and butter. Press into a 9-inch pie pan (grease the sides of a 9-inch springform pan if using). Place in the freezer for 15 minutes and make the filling.
STEP 2: Start the filling. Beat the peanut butter, softened cream cheese, vanilla extract, and powdered sugar for about 2 minutes until fluffy. Mix in the finely chopped butterfingers.
STEP 3: Whip the cream. In a separate bowl, beat the whipped cream at medium speed for 8-12 minutes until you have stiff peaks (they stand on their own).
STEP 4: Fold in the cream. Gently fold the whipped cream into the peanut butter mixture.
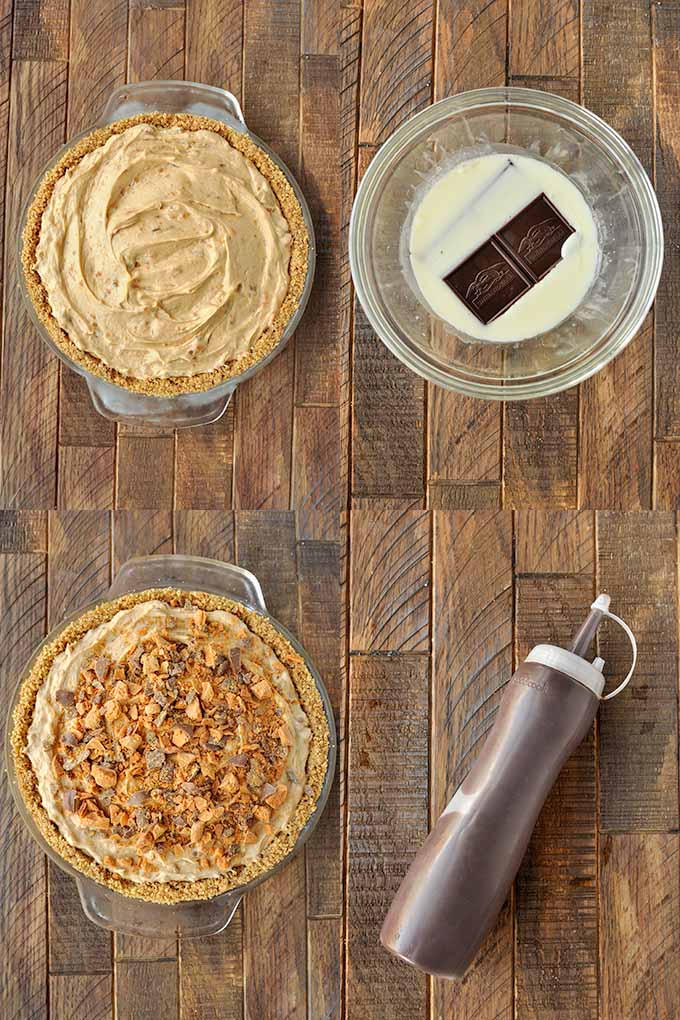
STEP 5: Fill the crust. Pour that into the chilled pie crust and put back into the freezer for around 30 minutes. It needs to be cold before adding on the chocolate drizzle.
STEP 6: Make the ganache. In a large microwave-safe bowl, stir together heavy cream and corn syrup, and microwave for 2 minutes. Add the chocolate and let it sit for 3 minutes. Add salt, then whisk until the chocolate is melted and smooth.
STEP 7: Decorate the pie. Let the chocolate cool to room temperature, then put in a plastic bottle to drizzle over the pie. Sprinkle cold pie with chopped up butterfingers and drizzle on chocolate ganache.
STEP 8: Chill and serve. Cover the pie and place in the fridge for at least 5 hours or in the freezer for 2 hours before serving. If placed in the freezer, let it come to room temperature for about 20 minutes before enjoying.
Tips for Success
- Let your cream cheese come to room temperature before whisking. It will fluff up much better than if it’s cold.
- Be patient while whipping your cream, and stop as soon as it has stiff peaks. Otherwise, it can split and turn into butter.
- The filling must set in the fridge, so give yourself plenty of time to chill it before serving.
- It’s best to use either an electric mixer or a stand mixer to get the fluffiest filling.
- You can also use a food processor to blitz the cookies into fine crumbs.
Recipe Variations
- Pre-made crust. Use a pre-made crust from the store for a No Bake Butterfinger Pie.
- Oreo crust. Add extra chocolate flavor with a chocolate Oreo crust!
- Different candy bars. Replace the Butterfinger with Heath Bars or even Reese’s Pieces for a slightly different flavor profile.
- Miniature pies. Use a muffin pan to make mini Butterfinger pies. You’ll likely need more crust than normal, so make extra!
- Bag of butterfingers. Instead of buying 5 butterfinger candy bars, get a 10 ounce bag of fun size candy bars instead.
- Make it gluten-free. For a gluten free pie, use either gluten free chocolate cookies or graham crackers.
Frequently Asked Questions
How do you make Butterfinger Pie?
The good thing about Butterfinger pie is that it’s such an easy recipe! First, you’ll need to either make or buy a graham cracker crust. The filling is made by whisking together cream cheese, peanut butter, powdered sugar, Butterfinger pieces, and vanilla extract.
Then, you’ll need to whip cream until it has stiff peaks. Fold the whipped cream into the cream cheese mixture until it has a mousse-like consistency. Add the filling to the crust, then prepare a simple ganache drizzle in the microwave. Decorate your pie with the ganache and more chopped Butterfinger pieces. Let your pie chill for 5 hours or overnight then serve!
What is the middle of a Butterfinger made of?
Did you know that the original Butterfingers are made with peanut butter? That crunchy, flaky, sweet filling is a mixture between peanut butter and hard candy, which is how it gets that brittle texture. The peanut butter candy is then enrobed in milk chocolate to contrast the sweet and salty filling.
Is Butterfinger Pie gluten-free?
Since Butterfinger candies are naturally gluten-free, this decadent pie can very easily be gluten-free too. The only source of gluten is the graham cracker crust, so use gluten-free graham crackers instead.
How to Store & Reheat
How to refrigerate Butterfinger Pie? Store leftover pie by covering it with plastic wrap or placing it in an airtight container in the fridge. The pie will stay fresh for approximately 4-5 days in the fridge.
How to keep at room temperature? This pie needs to be chilled, so it’s best to bring it out of the fridge only when serving or for up to 2 hours.
How do you reheat Butterfinger Pie? This is a chilled pie, and if it’s heated, it will melt and lose all of its integrity.
Can I Freeze Butterfinger Pie?
How to freeze this easy Butterfinger pie recipe? To freeze your Butterfinger Pie for later, store it in an airtight container and keep it in the freezer for up to 6 months. Let it thaw in the fridge overnight before serving.
Try these other sweet recipes!
- No Bake Pumpkin Cheesecake Bars
- Lemon Freeze Recipe
- Cherry Cheesecake Dump Cake
- No Bake Butterscotch Cornflake Cookies
- Apple Cinnamon Bread
If you’ve tried this homemade butterfinger pie recipe, don’t forget to give me a star rating and leave me a comment below in the comment section. I love to hear from people who have made my recipes!
NEVER MISS A RECIPE!
Follow me on social media for more recipe ideas & inspiration!
PINTEREST / FACEBOOK / INSTAGRAM
Homemade Butterfinger Pie
Ingredients
For the crust
- 12 graham cracker sheets crushed, 1 1/2 cups
- 1 tablespoon sugar
- 6 tablespoons butter unsalted, melted
For the filling
- 1 cup peanut butter creamy
- 8 ounces cream cheese softened
- 3/4 cup powdered sugar
- 1 teaspoon vanilla extract
- 1 cup heavy whipping cream
- 3 1.9-ounce butterfinger candy bars chopped in small chunks
Chocolate ganache
- 1/3 cup heavy whipping cream
- 1/2 tablespoon corn syrup
- 2 ounces bittersweet or semi sweet chocolate
- pinch salt
Garnish
- 2 1.9-ounce butterfinger candy bar
Instructions
- In a medium mixing bowl, combine graham cracker crumbs, sugar, and butter. Press into a 9-inch pie pan (grease the sides of a 9-inch springform pan if using). Place in the freezer for 15 minutes and make the filling.
- Beat the peanut butter, softened cream cheese, vanilla extract, and powdered sugar for about 2 minutes until fluffy. Mix in the finely chopped butterfingers.
- In a separate bowl, beat the whipped cream at medium speed for 8-12 minutes until you have stiff peaks (they stand on their own).
- Gently fold the whipped cream into the peanut butter mixture.
- Pour that into the chilled pie crust and put back into the freezer for around 30 minutes. It needs to be cold before adding on the chocolate drizzle.
- In a small microwave-safe bowl, stir together heavy cream and corn syrup, and microwave for 2 minutes. Add the chocolate and let it sit for 3 minutes. Add salt, then whisk until the chocolate is melted and smooth.
- Let the chocolate cool to room temperature, then put in a plastic bottle to drizzle over the pie. Sprinkle cold pie with chopped up butterfingers and drizzle on chocolate ganache.
- Cover the pie and place in the fridge for at least 4 hours or in the freezer for 2 hours before serving. If placed in the freezer, let it come to room temperature for about 20 minutes before enjoying.
Notes
-
- Let your cream cheese come to room temperature before whisking. It will fluff up much better than if it’s cold.
-
- Be patient while whipping your cream, and stop as soon as it has stiff peaks. Otherwise, it can split and turn into butter.
- The filling must set in the fridge, so give yourself plenty of time to chill it before serving.
-
- Buy a 10-ounce bag of fun size butterfingers.
- Store in an air tight container in the fridge for 4-5 days.
Nutrition
Did you make this recipe?
Please let me know how it turned out!
I love hearing from you! Share a picture of the recipe on Instagram and hashtag it #homecookedharvest.
This butterfinger pie is absolutely gorgeous! Perfect for the holidays. Love the step by step photos. Thanks for the recipe!
This was fun to make. It turned out so delicious. Everyone loved it and wanted the recipe!
OMG, this butterfinger pie turned out so good, made and took yesterday for potluck party. Everyone wanted a recipe 🙂
I followed the recipe closely, and it turned out perfectly. It’s such an easy recipe to make, and the result is out-of-this-world delicious. I can’t wait to make it again for my friends and colleagues!